Catalog Browse > Products > Edit Products/Classes
Editing Products/Classes
Advanced Mode Editing
-
Select your Category from the Catalog > Browse page.

-
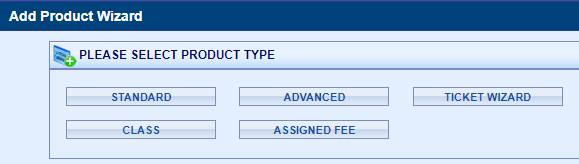
Click on the PRODUCT icon to view the Add Product Wizard page.
-
Click the Advanced button.
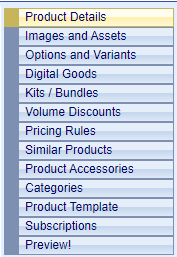
This will take you to the Edit Product page where you will see a variety of options in the left side menu. By default, the Product Details Menu item is selected.
PRODUCT MENU ITEMS
|
Product Details: The summary page for your product. Where you enter basic data, tax, shipping, and descriptions. Images and Assets: You can upload a new image or attach additional images to a product. Options and Variants: A product variant is a unique combination of options. Variants can be used to control inventory. Options can be used to display image swatches. Digital Goods: Attach an existing digital file to a product or it's variants. Kits / Bundles - Has its own section. Volume Discounts: Attach an existing discount method to a product if that feature is available on your ePayTrak site. Pricing Rules: You can set multiple price points for a product based on date or member group. Similar Products: These are the products that are related, that should be highlighted in cross-selling scenarios. Product Accessories: Select the products that are used in up-selling scenarios during checkout. Categories: Select additional categories that should display this product, or assign a category to an orphaned item. Product Template: Attach an existing product template. A product template can be used to gather information from the customer. Preview: Opens a new browser window so you can view your product as a customer would see it before you offer the product to the public. |
To Add Basic Product information:
-
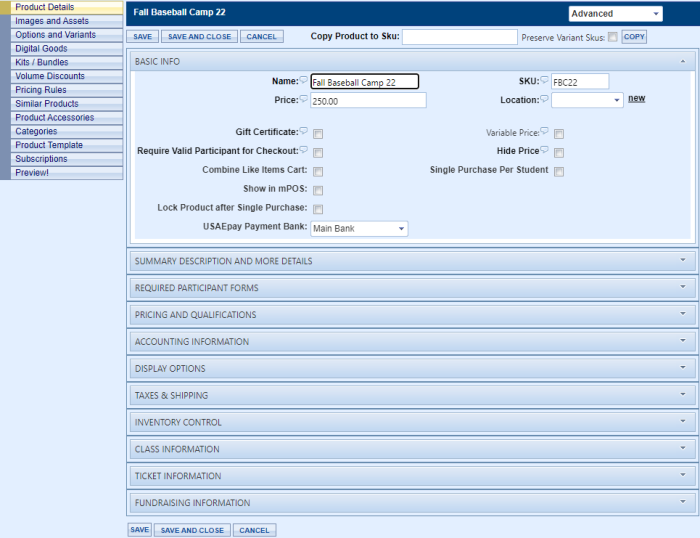
Enter the Name, Sku and the Product price.
-
If the product utilizes a Gift Certificate, check the box so the system will automatically generate gift certificate serial numbers as part of the fulfillment process. This is used rarely in ePayTrak since most schools do not issue gift certificates.
-
If the Variable Price box is checked, the customer can enter their own price. This would typically be used in conjunction with a Student Fee to allow partial payments, or for a fund-raising product where a customer enters the amount he/she wishes to donate or the variable price is used on the Admin side only.
-
If you want parents to use a valid participant/student ID for the purchase, check the Require Valid Participant for Checkout box. This is only used when student ID's are pre-loaded into ePayTrak via import or Databridge.
-
Next is the Combine Like Items Cart setting. This setting governs how items can be combined in a cart. A customer can add multiple Classes/Products for just one student/participant if this setting is checked. If you want a customer to purchase the same class for two separate students, then this setting should be unchecked. You will want to leave this setting unchecked in most situations.
-
Show in mPOS: This will enable any product to be available for use in our mPOS (mobile Point-of-Sale system) which is available with our premium Ticket functionality.
-
Lock Product after Single Purchase: You would use this setting rarely, if at all. If you check this box, the product will lock automatically after the product is purchased.
-
Single Purchase Per Student: Now you can limit a student purchase to only one item by checking this box.
-
USAEpay Payment Bank: If you are using multiple banks, you select the correct bank from the drop-down for the product.
-
Click the SAVE button when finished with this section.
Summary Description and More Details
The next section is Summary, Description and More Details. There is complete information here.
Required Participant Forms
Required Participant Forms: If you want to attach a Participant Form to a product so that parents must enter data before they can make a purchase of the product, click on the form you wish to use. If you need more than one form selected, hold down the control key (PC) and click the ones you wish. You can also deselect a form by holding down the Control Key and clicking the selected form.

Pricing and Qualifications
You can add different prices using the Pricing and Qualifications section.
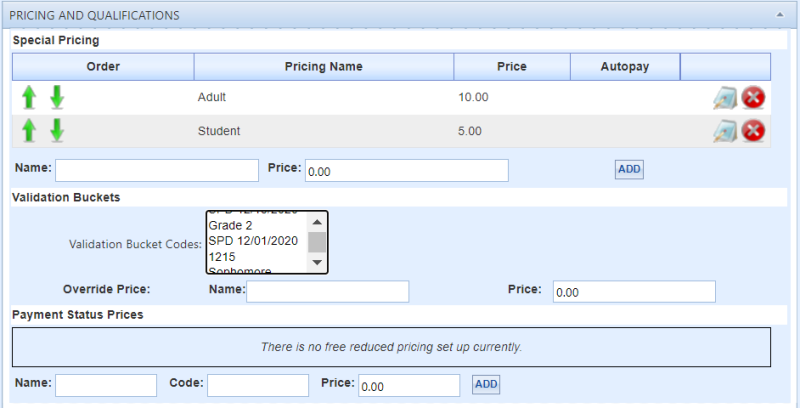
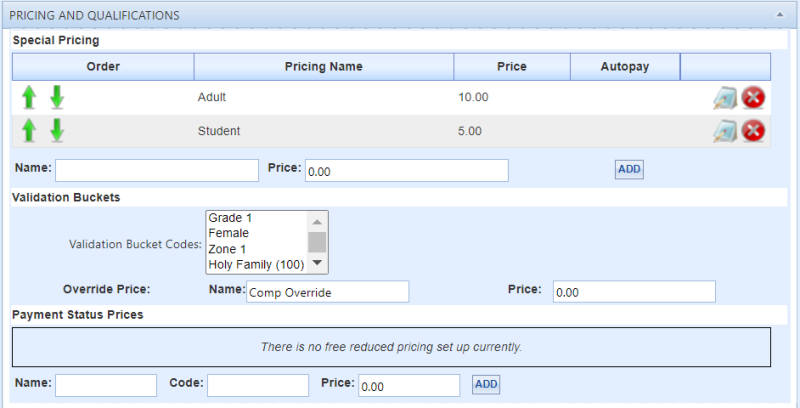
We have 'Special Pricing' available to our products in ePayTrak. This makes it easier to assign different prices to a product/class whether you are using Options and Variants for inventory or not.
-
Click in the Name box to give your price a Pricing Name. I entered Adult and $10 for a price. Click the 'Add' button. Keep these names as brief as possible due to character limitations. 35 Characters is the normal maximum.
-
I added Student Pricing of $5 using the same steps as shown below.
-
You can use the Green Arrows on the left side to arrange the pricing in the order you wish.
-
You can also setup Override Pricing that is available only to the admin user only, not the public. If you are selling comp tickets for a theatre production, you can use the Comp Override that I entered below. Then you can easily process a comp $0 ticket sale on the Web mPOS app. This feature was primarily added for ticket events.
Payment Status Prices
A newer feature in ePayTrak. If your school is connected via Databridge from your School Information System you now have the option of adding Free and Reduced Student Pricing. This must be pre-configured by ePayTrak personnel prior to your usage.
Below is a screenshot of that page. Just add the Codes and Prices if your site is configured to accept Free and Reduced Pricing. Too add an item enter your Text in the Name Code with the proper Code and Price and Click Add. In the screenshot below, I entered the information in the fields to demonstrate how to add Reduced pricing.

Assigning Validation Buckets
-
If you wish to limit a product/class purchase by student grade level, Validation buckets can be helpful. See Validation Bucket creation for more information. Student ID's and grades must be pre-loaded in ePayTrak for this to work.
-
Choose the Class level you wish to limit purchases for your product. In this case, I chose Sophomore so only students with Sophomore bucket codes can purchase this class.
-
Click SAVE when finished with this section.

Accounting Information
The next section you see in your product setup is Accounting Information as shown below. We've made some improvements in the Accounting Codes section to include the Code number and Descriptions.

-
It is strongly recommended that you create your Department and Accounting Codes in the Configure > Store section before adding any products. Those codes will be available as drop-down choices as seen above. See Accounting and Department Code creation.
-
Click the Accounting Code you wish to use for this product. In this case, I clicked Community Ed to select the Accounting Code. Then select the Department Code in the same manner. For accurate reporting, only select one Accounting Code and one Department Code for each class. These codes must be entered on the Configure > Store page to enable selection at the product level. To Deselect an item, hold the Control Key on the Keyboard and click the code name.
-
Click the SAVE button when finished with this section.
Product Display Options:
In the DISPLAY OPTIONS section, you can change how this product will be shown to your customer.

-
The Visibility choices are Public, Hidden, or Private. If you select Public, everyone can see the product. If you select Hidden, the public can't see the product offering. If you select Private, the public can't purchase the product, even if they've added that product to their basket previously.
-
If you want this product to appear on the home page, as a featured product, then check Featured.
-
Choose a Display Page if different than the store's default Product display page. This is not normally recommended.
-
If you want to show this product in your store, but not allow customers to purchase, then check Disable Purchase.
-
If you want to choose a different Theme, for only this page, then select one from the list of choices. This is not normally recommended.
-
If you want to upload product feeds such as Google, Yahoo, and Shopping.com, and exclude this product, then check Exclude from Feeds.
-
Click the SAVE button when finished with this section.
Taxes & Shipping and Inventory Control
More details are available under two separate sections: Products Taxes & Shipping & Products Inventory Control.

Class Information
The Class Information Section is very detailed and has more information here.
Ticket Information
The Ticket Information Section has more detailed information here.
Fundraising Information
A recent addition is a Fundraising Information Section. If you want your Fundraiding product to get special notice on the Home Page, click the Is Fund Raiser Box to check it.
Add the Fund Raising Goal. Next the Header and the text.

When your product is marked as Fundraising Product, you'll see it on the Home Page as shown below. Note the box to the right. It shows the Header, Text, the Goal and Raised so Far amounts.

Related Topics:
-
Adding Product Descriptions - Create enticing products with attractive product descriptions.
-
Upload Product Images - Learn how to add an image to your product.
-
Validation Buckets - How to create Validation Buckets for your products.
-
New Product Wizard - Review of our New Product Wizard.
-
Create AutoPay Recurring Orders - Adding Products/Classes to a Wait List, add times and dates to your classes.
2022 © Edutrak Software, LLC